
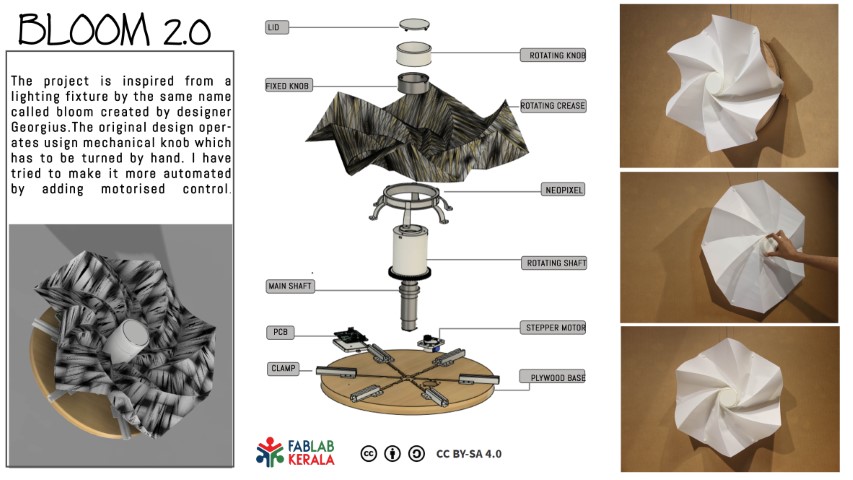
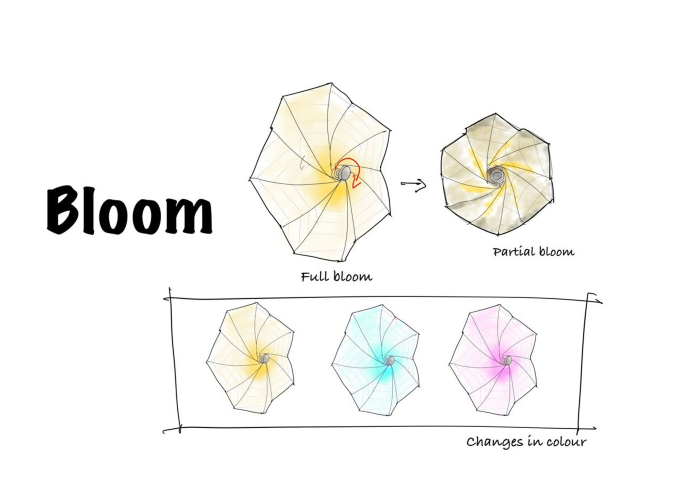
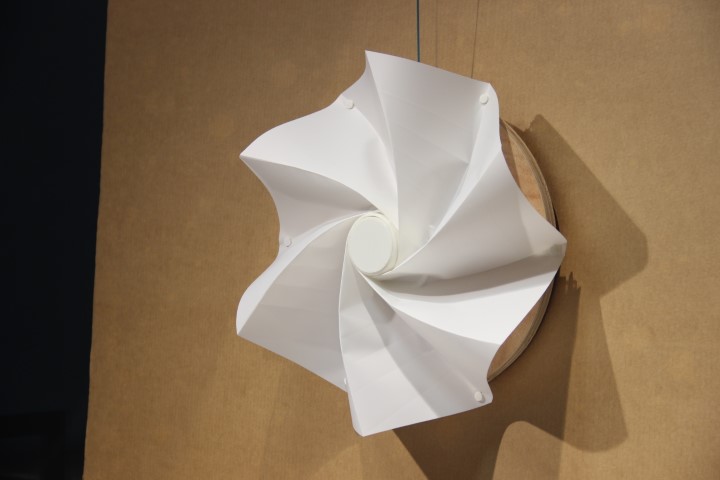
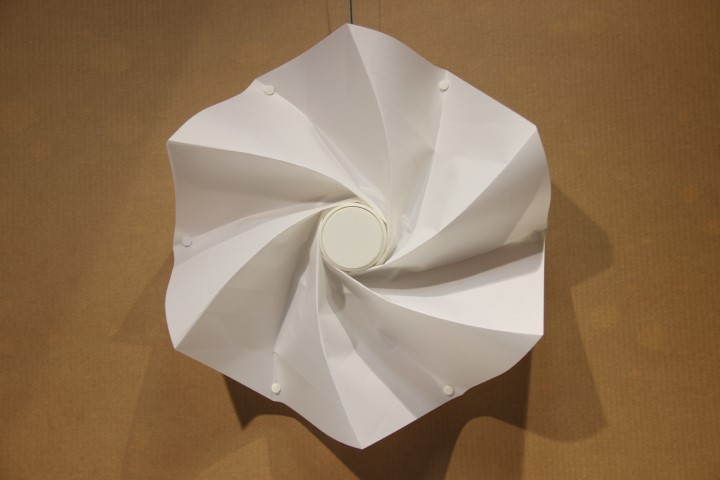
The project is basically a blooming light which will give the impression that it glows when the flower blooms.
Concept
The names comes from the sense that it has to bloom like a flower. The pattern is actually inspires by NASA’s solar panel pattern
FEATURES
DESIGN
Design of pattern
The design was shown in the video I referred to but I still I had to figure out the pattern which enables proper movement. I did the design in Autocad which seemed more convenient
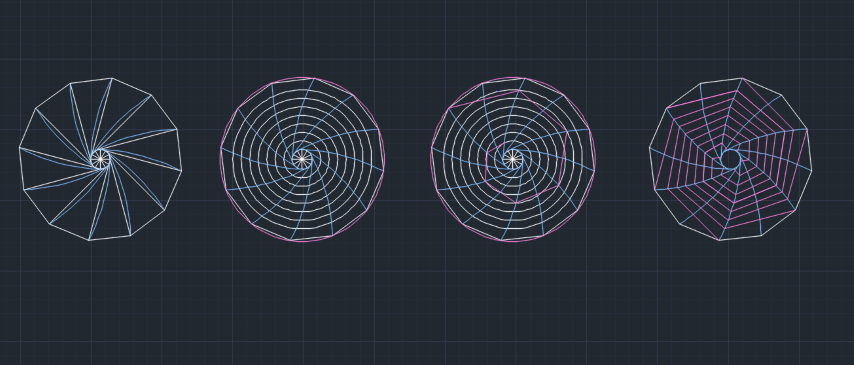
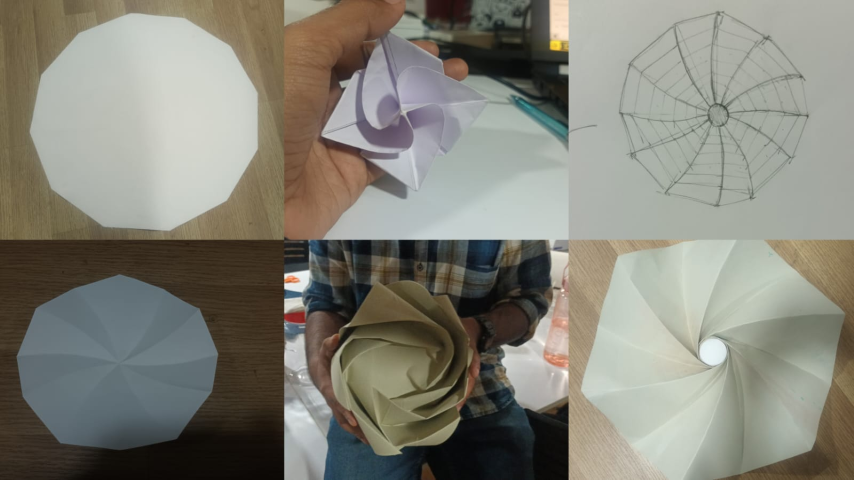
I tried cutting the pattern of with slight changes in dimension. As of now the pattern works in a chart paper. I have to figure out what material I can actually use.
Factors to be considered while choosing the material
- Has to be stiff enough to maintain the shape after creasing
- Should let light pass through it
- Should’nt tear or wrinkle after using multiple times
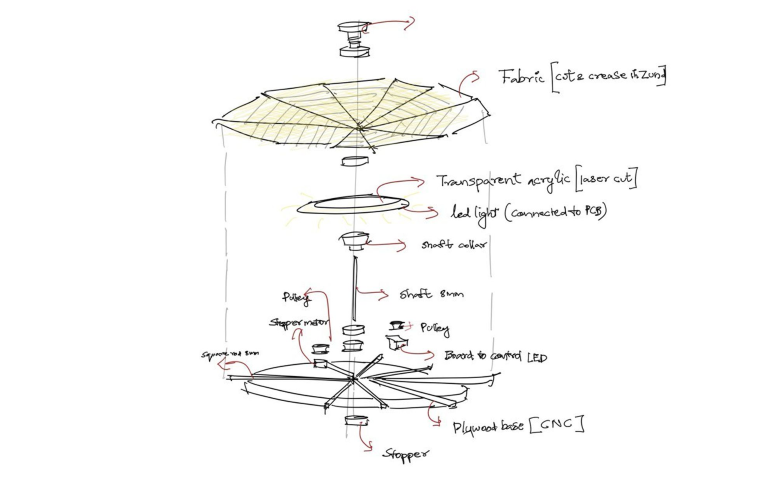
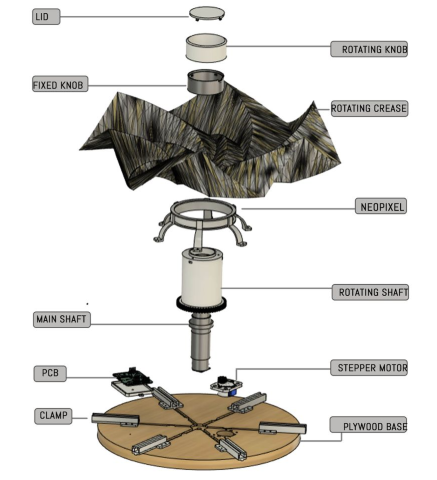
I made the 3D model in Fusion 360
.png)
PROCESS
I had to use almost all the machines in the lab starting with Zund, Lasercutter, Shopbot, 3D printer, Modela
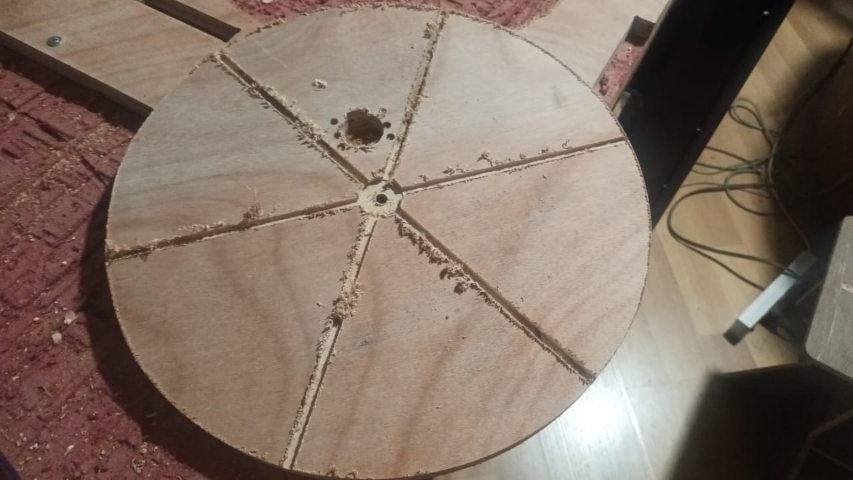
CNC cutting base
To see if the design actualy works, it was important to cut the base so that the other parts can be assembled on it. So I decided cut the base as soon as I finalised the pattern
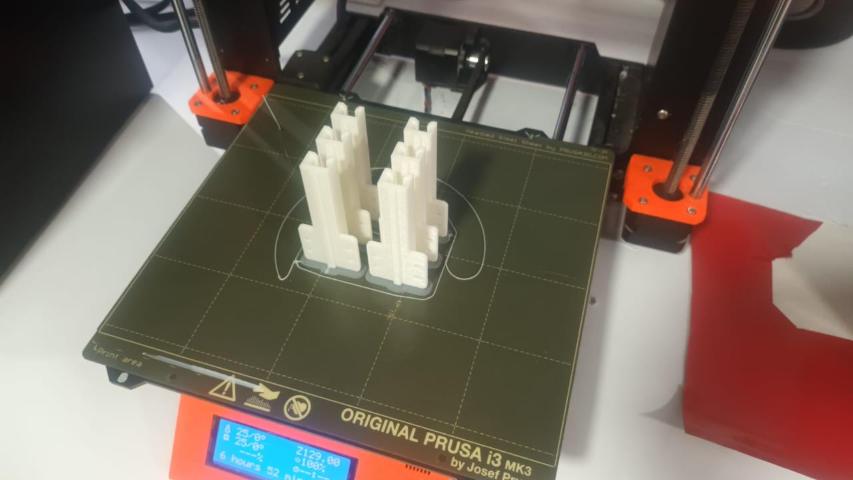
3D printing parts
I have finished 3D printing almost all the required parts. Mainly shafts, clamps, gears


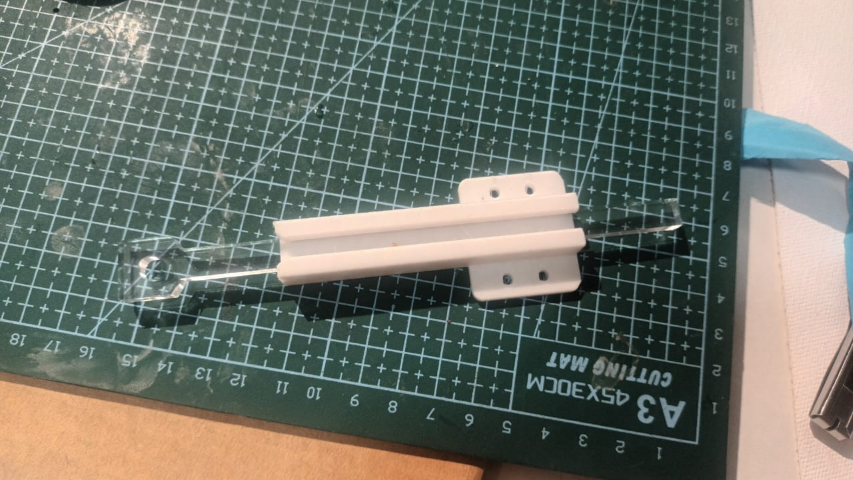
Laser cutting acrylic rod
The design I refered actually used a MS rod but I decided to use acrylic board instead. I was also doubtful about the length of the rod until I finalised the pattern. The length of rod controls how much the pattern can actually bloom
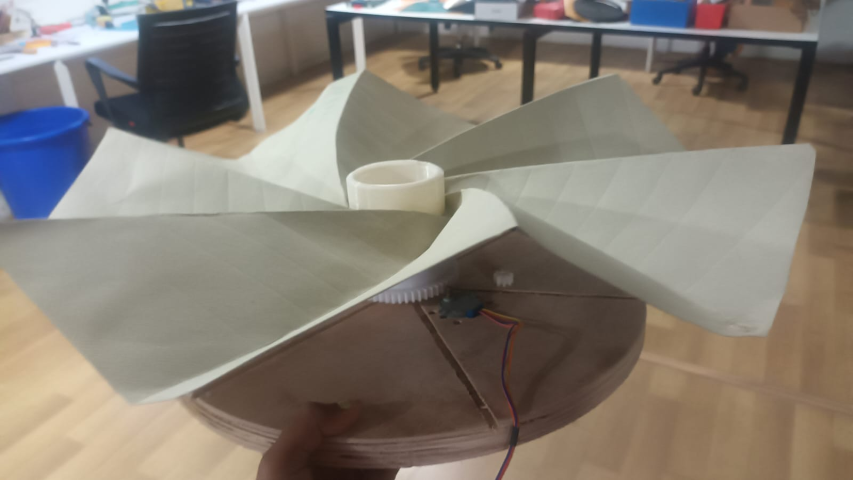
First prototype
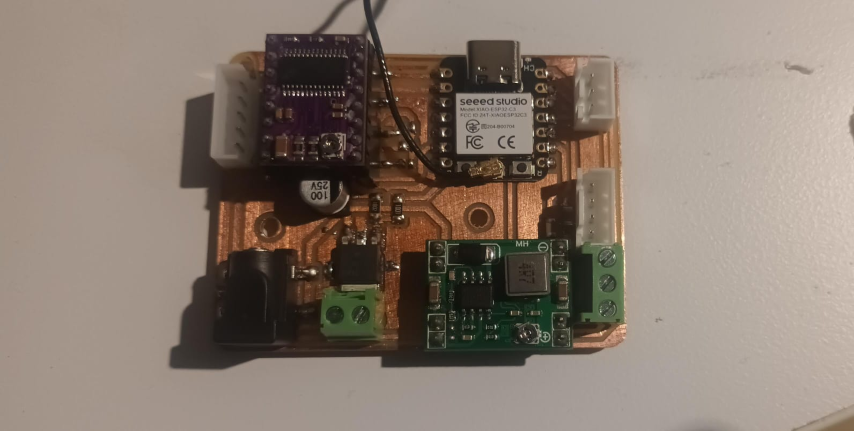
Electronics
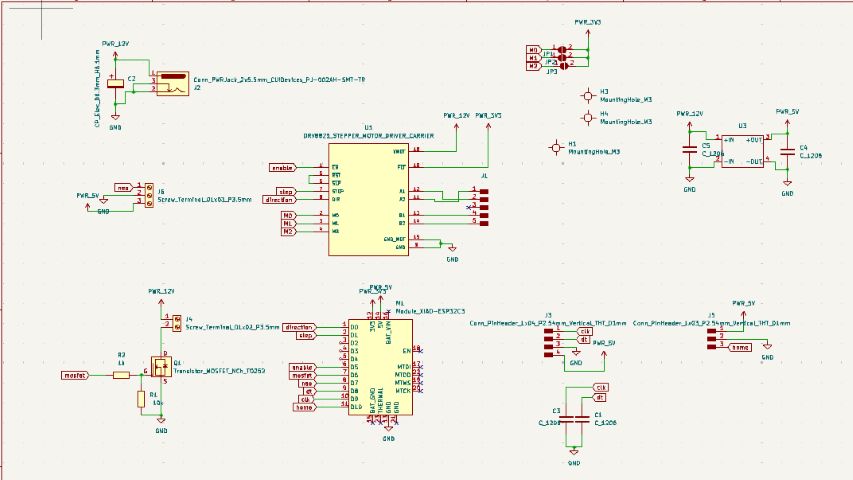
PCB Design
I designed the PCB in Kicad
Mainly I wanted to operate the stepper motor and Neopixel. So I used DRV8825 motor driver and XIAO ESP32S3 microcontroller

Then I did the milling using Modela
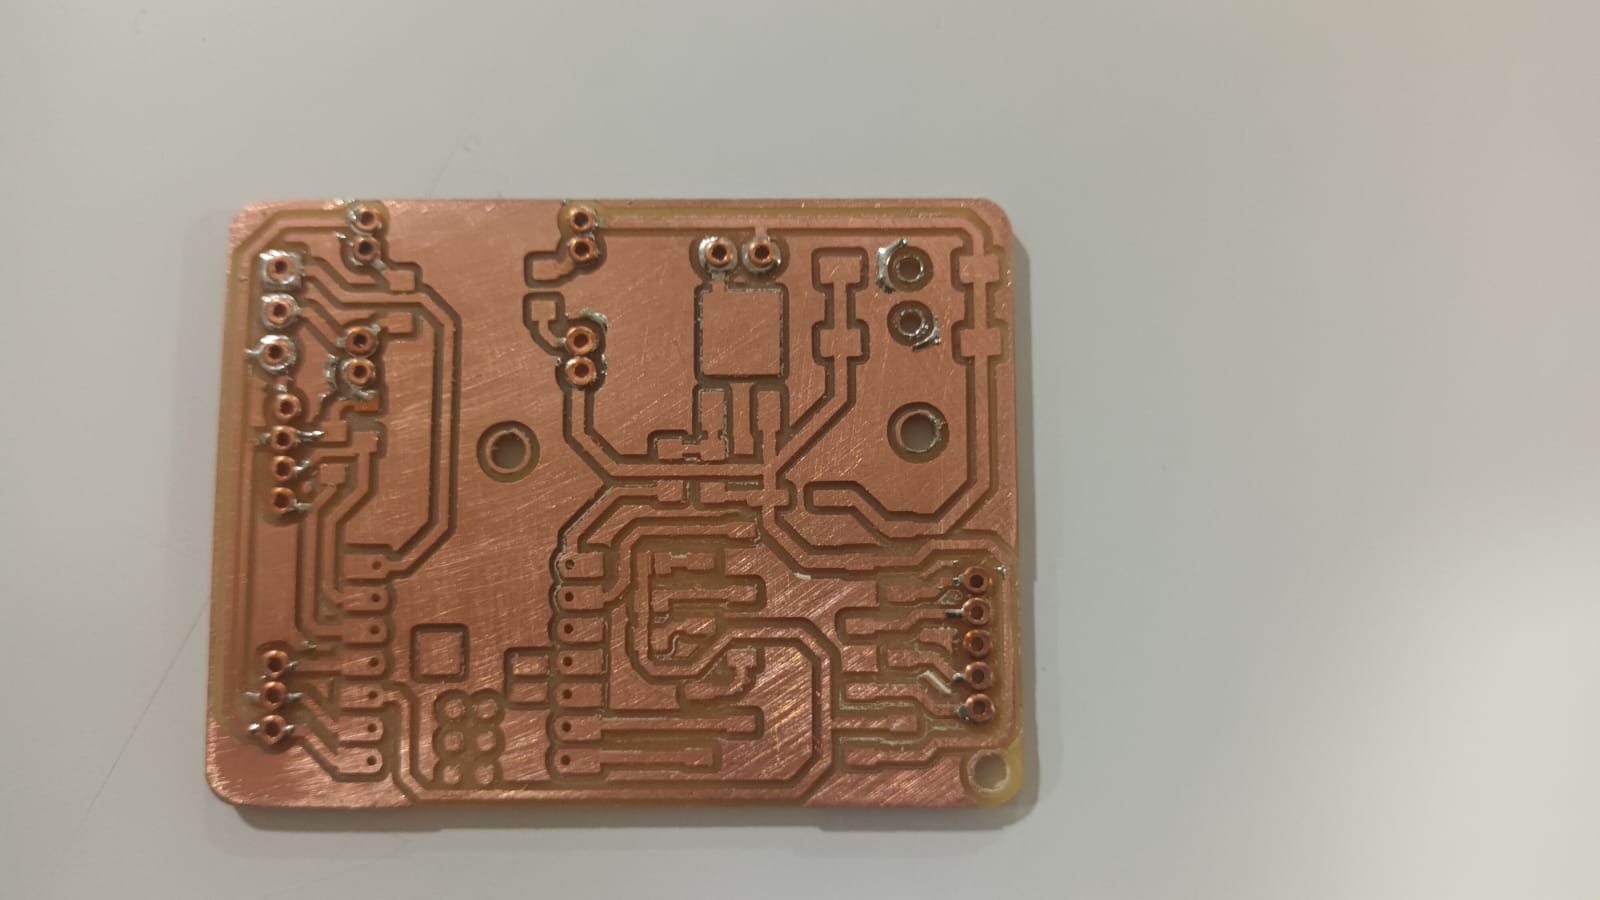
After soldering the components
Programming
Initially I just tried running the stepper motor adn uploade the program with the help of our instructor Saheen
#include <Stepper.h>

// Define the number of steps per revolution for the 28BYJ-48 stepper motor
const int stepsPerRevolution = 2048;

// Initialize the stepper library on pins 8, 9, 10, and 11
Stepper myStepper(stepsPerRevolution, 8, 10, 9, 11);

void setup() {
  // Set the speed at 15 RPM
  myStepper.setSpeed(17);
  // Initialize the serial port
  Serial.begin(9600);
}

void loop() {
  // Step forward
  Serial.println("Stepping forward...");
  myStepper.step(4096);
  delay(1000);

  // Step backward
  Serial.println("Stepping backward...");
  myStepper.step(-4096);
  delay(1000);
}
Test run
Then I added the control for neopixel LED with the help of my friend Sayanth
#include <AccelStepper.h>

// Define the number of steps per revolution for the 28BYJ-48 motor
const int stepsPerRevolution = 160000; // Adjusted for 28BYJ-48 motor

// Define pins using #define
#define STEP_PIN D1
#define DIR_PIN D0
#define ENABLE_PIN D5  // Replace with actual pin
#define HALL_SENSOR_PIN D10 // GPIO 10 for Hall Effect sensor

// Create an instance of the AccelStepper class
AccelStepper myStepper(AccelStepper::DRIVER, STEP_PIN, DIR_PIN);

void setup() {
  // Set motor pins as outputs
  pinMode(ENABLE_PIN, OUTPUT); // Set enable pin as output

  // Set the initial motor state (disabled)
  digitalWrite(ENABLE_PIN, LOW); // Enable pin is usually LOW for active

  // Set the maximum speed of the motor (in steps per second)
  myStepper.setMaxSpeed(8000); // Adjust this value for desired speed

  // Set the acceleration of the motor (in steps per second squared)
  myStepper.setAcceleration(6000); // Adjust this value for desired smoothness

  // Setup Hall Effect sensor pin as input with internal pull-up resistor
  pinMode(HALL_SENSOR_PIN, INPUT_PULLUP);

  // Initialize serial communication
  Serial.begin(9600);

  // Enable the motor initially
  digitalWrite(ENABLE_PIN, LOW);
  // Start rotating the motor
  myStepper.move(-stepsPerRevolution); // Move the motor one revolution in reverse direction
}

void loop() {
  // Read the Hall Effect sensor value
  int hallValue = digitalRead(HALL_SENSOR_PIN);
  Serial.print("Hall Effect Sensor Value: ");
  Serial.println(hallValue);

  // Check if the Hall Effect sensor value is 0
  if (hallValue == 0) {
    // Stop the motor
    myStepper.stop();
    // Disable the motor
    digitalWrite(ENABLE_PIN, HIGH);
  }

  // Run the stepper motor
  myStepper.run();
}
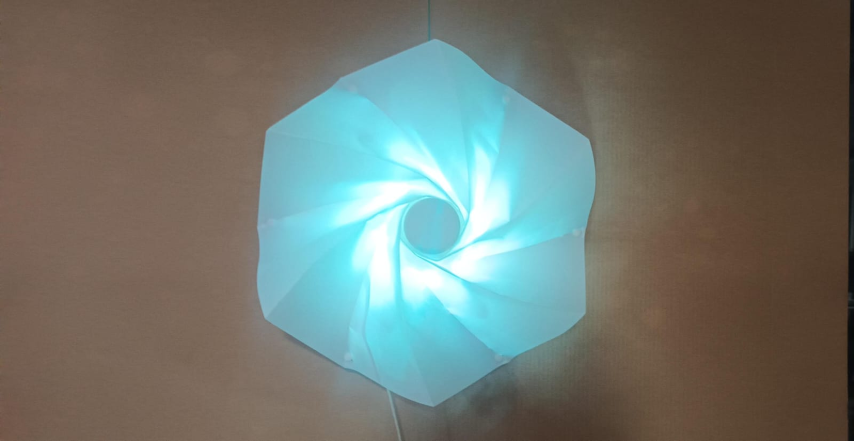
Neopixel light
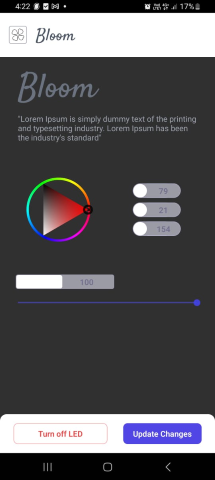
Interface
I wanted an app to control the movement of the lamp. I created the interface in react with the help of instructor Midlaj.
// CustomNavbar.js

import React from 'react';
import { View, Text, Image } from 'react-native';
import { TriangleColorPicker, fromHsv } from 'react-native-color-picker';
import ReactSlider from '@react-native-community/slider';
import tinycolor from 'tinycolor2';


export const Navbar = () => {
  return (
    <>
      <View className="h-[10%] flex flex-row items-center gap-x-4 bg-white px-4">
        <View className="w-8 h-8 p-1 border-gray-400 border rounded border-opacity-5 ">
          <Image source={require('./assets/logo.png')} className="w-full h-full" />
        </View>
        <Text className="text-gray-600 text-3xl mt-3" style={ { fontFamily: 'Satisfy-Regular' } }>Bloom</Text>
      </View>
    </>
  );
};

export const Banner = () => {
  return (
    <>
      <View className="p-4">
        <Text className="text-gray-500 text-6xl pt-4 px-4 mt-2" style={ { fontFamily: 'Satisfy-Regular' } }>Bloom</Text>
        <Text className="text-gray-400 px-4">
          "Lorem Ipsum is simply dummy text of the printing and typesetting industry. Lorem Ipsum has been the industry's standard"
        </Text>
      </View>
    </>
  );
}

export const Controls = ({ color, setColor }) => {
  const handleColor = (color) => {
    const hex = fromHsv(color);
    const rgb = tinycolor(hex).toRgb();
    setColor({red: rgb.r, green: rgb.g, blue: rgb.b});
  }
  return (
    <>
      <View className="w-full h-[25%] flex flex-row p-4 mt-6">
        <View className="w-1/2 h-full">
          <TriangleColorPicker
            onColorChange={handleColor}
            style={{ width: '100%', height: "100%"}}
            hideSliders
            hideControls
            sliderComponent={ReactSlider}
          />
        </View>
        <View className="w-1/2 h-full flex justify-center items-center">
          <View className="my-1 flex flex-row justify-center items-center border rounded-full border-[#b8b8d896] overflow-hidden bg-[#e5e5f796]">
            <View className="w-6 h-6 rounded-full flex justify-center items-center bg-white">
              <Text className="font-bold text-xs">R</Text>
            </View>
            <Text className="px-4 text-[#626288c9] font-semibold min-w-[60px] text-center">{color.red}</Text>
          </View>
          <View className="my-1 flex flex-row justify-center items-center border rounded-full border-[#b8b8d896] overflow-hidden bg-[#e5e5f796]">
            <View className="w-6 h-6 rounded-full flex justify-center items-center bg-white">
              <Text className="font-bold text-xs">G</Text>
            </View>
            <Text className="px-4 text-[#626288c9] font-semibold min-w-[60px] text-center">{color.green}</Text>
          </View>
          <View className="my-1 flex flex-row justify-center items-center border rounded-full border-[#b8b8d896] overflow-hidden bg-[#e5e5f796]">
            <View className="w-6 h-6 rounded-full flex justify-center items-center bg-white">
              <Text className="font-bold text-xs">B</Text>
            </View>
            <Text className="px-4 text-[#626288c9] font-semibold min-w-[60px] text-center">{color.blue}</Text>
          </View>
        </View>
      </View>
    </>
  );
}

export const SliderBrightness = ({brightness, setBrightness}) => {
  return (
    <>
      <View className="p-4 mt-4">
        <View className="my-1 ml-3 w-1/2 flex flex-row  items-center border rounded border-[#b8b8d896] overflow-hidden bg-[#e5e5f796]">
          <View className="px-3 h-6 rounded flex justify-center items-center bg-white">
            <Text className="font-bold text-xs">Brightness</Text>
          </View>
          <Text className="px-4 text-[#626288c9] font-semibold w-1/2 text-center">{brightness }</Text>
        </View>
        <ReactSlider
          style={{ width: '100%', height: 40  }}
          value={brightness}
          onValueChange={value => setBrightness(value)}
          minimumValue={0}
          maximumValue={100}
          thumbTintColor='rgba(67,67,233,0.9)'
          maximumTrackTintColor='#626288c9'
          minimumTrackTintColor='rgba(67,67,233,0.59)'
          step={1}
        />
      </View>
    </>
  );
}
The app looks like this
working
Final Result

Presentation Video